Coffee Starter Kit: Best Accessories for Beginner Home Baristas
best coffee accessories for beginner home baristas
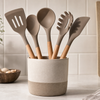
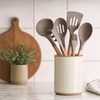
Your Starter Kit: The Non-Negotiable Coffee Accessories
Every home barista starts with a machine and a dream. But without the right gear, that dream can turn into a puck of frustration. You don’t need a drawer full of gadgets. You need the few tools that actually fix the problems beginners face: uneven tamping, messy dosing, and guessing your ratios. Think of these three items as your foundation. They’ll save you money, counter space, and burnt mornings. And they’re all part of what makes a smart Coffee Accessories collection worth investing in from day one.
Key Takeaways
- A tamper with a flat base helps you apply even pressure and pull more flavorful shots.
- A dosing funnel keeps coffee grounds contained for a cleaner, more consistent workflow.
- A digital scale removes the guesswork from your coffee-to-water ratio and saves you from wasted beans.
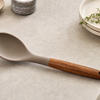
Why a Quality Tamper Is Your Most Important Tool
A tamper isn’t just a puck press. It’s the difference between a balanced shot and a sour disaster. Beginners often use the plastic tamper that comes with their machine, which flexes under pressure and distributes force unevenly. A quality tamper has a flat, machined base and a comfortable handle that lets you apply consistent pressure without wrist strain. Look for a diameter that matches your portafilter basket (usually 53mm for Breville, 58mm for most pro-sumer machines). A stainless steel base and a calibrated weight feel help you build muscle memory. Without a solid tamper, you’re guessing every single time.
How to Choose a Dosing Ring or Funnel
Messy countertops aren’t just annoying. Lost coffee grounds mean inconsistent dose weight and wasted beans. A dosing ring (sometimes called a dosing funnel) sits on top of your portafilter while you grind, containing the grounds so every grain lands where it belongs. Some rings are magnetic and lock onto the basket; others are simple tapered cylinders. Choose one that fits your basket diameter and has a smooth interior so grounds don’t cling. A good ring also lets you stir or distribute the grounds with a WDT tool before tamping, reducing channeling. It’s a five‑dollar fix that instantly cleans up your workflow.
The One Scale Every Home Barista Needs
Volumetric measurements from your machine’s pump are unreliable. Water hardness, bean freshness, and temperature all affect flow. A scale gives you precision. You need a scale that measures to 0.1 grams and fits under your espresso machine with a cup. A built‑in timer is a bonus for tracking shot time. Models with a silicone mat resist spills and are easy to wipe clean. Training weight for your dose and yield should be non‑negotiable. Once you start weighing, you’ll pull the same recipe consistently, and your taste buds will thank you. That’s the kind of control that separates café‑quality shots from kitchen experiments.
Level Up Your Latte Art (Without Getting Frother Envy)

You’ve dialed in your shot. Now you want that silky microfoam that pours into a rosetta. Milk frothing is where many beginners get stuck, but with a few smart choices you can skip the learning curve. These are some of the best coffee accessories for beginner home baristas looking to level up their milk game without breaking the bank.
| Feature | Manual Frother | Automatic Frother |
|---|---|---|
| Control over texture | Full control | Limited (pre‑set cycles) |
| Learning curve | Moderate (requires practice) | Low (press a button) |
| Best for | Latte art and microfoam | Hot milk and frothy foam |
| Cleaning effort | Quick rinse | Wand or pitcher with heating coil |
| Price | $20-$50 | $60-$150 |
| Durability | Simple mechanics, long lasting | Electronics can fail |
If you want to pour latte art, go manual with a steam wand or a handheld frother. If you just want warm, frothed milk for a morning latte, an automatic frother is fine. But remember: microfoam requires aeration and stretching, which only manual control provides. Whichever you choose, pair it with a quality pitcher and you’ll be pouring hearts in no time.
Milk Pitcher Sizes and Spout Types Made Simple
Pitcher size matters more than you think. A 12‑ounce pitcher is perfect for a single latte. A 20‑ounce holds enough for two drinks or larger volumes. The spout shape determines your pouring precision. A “pointed” spout (like a teapot spout) gives you thin, controlled streams for fine detail. A “round” spout is better for larger hearts. Beginners should start with a 12‑ounce pointed pitcher. Look for a stainless steel construction with a welded handle (not riveted) so it stays solid through daily use. A pitcher with measurement markings inside helps you track milk volume and avoid overflow.
Your Latte Art Journey: From Blobs to Rosettas
Latte art isn’t magic. It’s physics and practice. Start with the basics: pour a full pitcher of milk, then practice pouring water into a dark mug to learn the wrist motion. Once you can pour a steady stream, work on the “dot” by raising and lowering the pitcher. Next, try a heart by pouring a steady base, then pushing through the center. Rosettas come later after you master wiggling your wrist while moving back. Don’t judge yourself by Instagram. Every barista started with blobs. Stick with a consistent milk temperature (140-150°F) and a consistent shot. Your first art may look like a cloud, but your friends won’t care because the coffee tastes amazing.
Fix Your Puck Prep (The Secret to Better Shots)
You’ve mastered the basics of espresso extraction, and your shots are starting to taste… well, good. But are they as good as they *could* be? The secret often lies not just in your machine’s power or the quality of your beans, but in the often-overlooked ritual of puck preparation. This is where you transform ground coffee into a perfectly uniform, dense puck, ready to accept water evenly and unlock the full spectrum of flavor. For beginner home baristas armed with the right tools, this stage is a game-changer, moving you from inconsistent results to reliably delicious espresso. These are some of the best coffee accessories for beginner home baristas that directly address this critical step.
What a WDT Tool Does and Why Beginners Should Try It
The dreaded "channeling". Where water finds easy paths through your coffee puck, leading to uneven extraction and bitter or sour tastes. Is a common woe for aspiring home baristas. A Weiss Distribution Technique (WDT) tool is your secret weapon against this. Think of it as a tiny, multi-needle rake. You insert it into your ground coffee in the portafilter and gently stir. The needles break up any clumps and distribute the grounds evenly, ensuring a fluffy, homogenous bed that water can flow through uniformly. This simple act is surprisingly effective at preventing channeling, leading to a smoother, more balanced shot. Some WDT tools are as simple as a few acupuncture needles glued into a pen body, while others feature more ergonomic designs. The key is the fine needles that can access small spaces and separate particles. Investing in a WDT tool is one of the most impactful upgrades you can make for consistent espresso.
How to Use a WDT Tool
- Dose Your Coffee: Grind your espresso beans directly into your portafilter, ideally using a dosing funnel to keep things tidy.
- Distribute with WDT: Insert the WDT tool into the coffee grounds. Gently stir in a circular motion, then move it around to cover the entire surface area of the portafilter. Aim to break up all visible clumps.
- Level the Surface: Once distributed, gently tap the portafilter on your counter or use a leveling tool to create a flat surface.
- Tamp: Proceed with tamping as usual. The even distribution from the WDT tool will make your tamping more effective.
Levelers vs. Tampers: Do You Need Both?
This is a question that often sparks debate, but the short answer for achieving truly excellent espresso is: yes, you probably need both. A tamper, whether it’s the basic one that came with your machine or an upgraded, weighted tool, is designed to compress the coffee grounds into a solid puck. Its primary function is to create resistance for the pressurized water. A coffee leveler, on the other hand, is a tool that sits on top of the portafilter and spins to create a perfectly flat, consistent surface *before* you tamp. It removes the variable of how evenly you distribute the grounds by hand or with a gentle tap. While a skilled barista can achieve a level surface with just a tamper and careful technique, a leveler ensures consistency shot after shot, especially for beginners still developing their feel for puck prep. It’s about minimizing variables and maximizing predictability.
Pros
- Levelers: Ensure a perfectly flat and consistent coffee bed, reducing the chance of channeling caused by uneven distribution. They help build muscle memory for consistent puck prep.
- Tampers: Essential for compressing the coffee grounds, creating the necessary resistance for proper espresso extraction. A quality tamper provides better weight distribution and comfort.
Cons
- Levelers: An additional tool to purchase and clean. Some argue they can compact the coffee too much if not used with the right pressure, though this is rare.
- Tampers: Without proper technique or a quality tool, tamping can lead to uneven pressure and channeling. The default plastic tampers often included with machines are generally inadequate.
Why a Precision Basket Can Save Your Morning
Your portafilter basket is more than just a coffee holder; it’s a critical component in controlling your shot’s flow. Standard baskets, often found in entry-level machines, can have less precise hole sizes and placement, leading to inconsistent water flow and uneven extraction. Precision baskets, however, are manufactured with tighter tolerances, meaning the holes are uniform in size and perfectly spaced. This uniformity allows water to pass through the coffee puck evenly, promoting better saturation and extraction. For home baristas, this translates to more forgiving shots, less channeling, and a noticeable improvement in flavor clarity. When combined with a good WDT tool and a quality tamper, a precision basket helps ensure that every dose of coffee has the best possible chance to yield an exceptional espresso. It’s a subtle but significant upgrade that pays dividends in taste and consistency, making your morning coffee ritual more reliable and enjoyable. Investing in these thoughtful accessories is key to building a capable Coffee Accessories collection.
Clean Gear, Better Espresso (And Why Your Tools Matter)
You’ve dialed in your espresso and frothed your milk. But what about the tools that help you get there? Keeping your coffee station pristine isn't just about aesthetics; it's fundamental to the taste of your brew and the longevity of your equipment. Neglecting cleaning can introduce stale flavors and even compromise the health of your ingredients. For beginner home baristas, understanding the role of clean gear and selecting tools made from quality materials is just as important as mastering extraction techniques. It’s about setting yourself up for success, shot after shot, and ensuring that your investment in Coffee Accessories truly pays off. This section dives into why your cleaning habits and material choices are non-negotiable for a superior coffee experience.
Why Silicone Tools Belong in a Coffee Bar Setup
When you’re building your ideal coffee setup, think beyond just the espresso machine and grinder. The supporting accessories play a significant role, especially when it comes to hygiene and durability. Pro-grade silicone stands out as a superior material for several key reasons. Unlike porous materials that can harbor bacteria or degrade over time, high-quality silicone is non-porous, naturally resistant to odors, and incredibly easy to clean. This means your tools won’t impart unwanted flavors into your coffee, and they’ll remain hygienic even with daily use. Furthermore, silicone’s heat resistance is a major advantage, allowing tools like spatulas or mats to withstand cleaning with hot water or even in a dishwasher without warping or melting. This inherent durability and health-conscious nature make silicone an indispensable part of any discerning home barista’s arsenal, contributing to both the quality of the final cup and the overall health of your kitchen.
Cleaning Your Knockbox, Portafilter, and More
Consistent, delicious espresso hinges on meticulous cleaning practices for all your coffee tools. Your portafilter, the vessel that that holds your ground coffee, is a prime candidate for daily attention. After each shot, promptly knock out the used puck and rinse the basket and portafilter to remove residual grounds and oils. These oils can turn rancid quickly, affecting the taste of subsequent brews. A dedicated knockbox, designed for safely disposing of used pucks, is an essential accessory that keeps your workspace clean and makes this process efficient. For accessories like milk pitchers, a thorough rinse immediately after use prevents milk residue from drying and becoming difficult to remove. Regularly cleaning your steam wand, if you use one, is also paramount to prevent clogs and bacteria buildup. Even smaller items like dosing rings or WDT tools benefit from a quick wash-down. For many of these items, especially those that come into direct contact with milk or coffee oils, materials that are simple to wipe down or are dishwasher-safe, like silicone, dramatically reduce cleaning effort and ensure a higher level of hygiene.
Pro Tip: Develop a quick cleaning routine immediately after brewing. Knock out pucks, rinse portafilters, and wipe down milk pitchers. This small habit prevents buildup and ensures your tools are always ready for your next perfect cup.
When Cheap Plastic Costs You More in the Long Run
It’s tempting to opt for the cheapest plastic accessories when starting out, but this approach often leads to greater expense and frustration down the line. Low-quality plastics can degrade quickly, becoming brittle, discolored, or even leaching chemicals into your coffee, especially when exposed to heat or cleaning agents. Think about a flimsy plastic knockbox that cracks after a few months or a plastic scoop that absorbs coffee odors. These items not only fail to perform their intended function effectively but also require frequent replacement, costing you more over time. Furthermore, they can negatively impact the taste of your coffee, a sacrifice no home barista should make. Investing in durable, food-safe materials like stainless steel and high-grade silicone from reputable brands ensures your tools will last, perform reliably, and maintain the integrity of your coffee’s flavor. This commitment to quality is a hallmark of thoughtfully curated Coffee Accessories. It’s about choosing tools that are built to last and are safe for your health, making them the best coffee accessories for beginner home baristas who value both quality and long-term value.
| Feature | High-Quality Silicone | Low-Quality Plastic |
|---|---|---|
| Durability & Longevity | Excellent; resistant to cracking, melting, and degradation | Poor; prone to breaking, warping, and becoming brittle |
| Heat Resistance | High (often up to 600°F) | Low; can warp or melt with heat |
| Food Safety | Non-porous, BPA-free, LFGB certified (for DI ORO) | Can leach chemicals, absorb odors, and harbor bacteria |
| Odor/Stain Resistance | Excellent; does not retain smells or stains | Poor; easily absorbs odors and stains |
| Cleaning | Easy to clean, dishwasher safe | Can be difficult to clean thoroughly, may retain residue |
| Impact on Taste | Neutral; does not affect coffee flavor | Can impart chemical or stale flavors |
Frequently Asked Questions
What is the best coffee tamper for beginner home baristas?
The best coffee tamper for beginner home baristas is a flat, machined stainless steel model that matches your portafilter basket diameter. A quality tamper applies even pressure and builds muscle memory, unlike the flimsy plastic tamper that comes with most machines. Look for a comfortable handle and a base that fits 53mm for Breville or 58mm for prosumer machines.
Why do I need a dosing ring for espresso?
A dosing ring or funnel keeps coffee grounds contained in your portafilter while you grind, preventing messy countertops and wasted beans. This simple tool ensures every grain lands where it belongs, leading to a more consistent dose weight. Choose a ring with a smooth interior and the correct basket diameter for easy cleanup and better puck prep.
How important is a coffee scale for home espresso?
A coffee scale is essential for home espresso because it lets you measure your dose and yield to 0.1 grams, removing the guesswork from your recipe. Volumetric measurements from your machine are unreliable due to changes in bean freshness and water temperature. With a scale that fits under your machine and includes a timer, you can consistently pull cafe quality shots.
What milk frother should a beginner use for latte art?
A beginner who wants to pour latte art should use a manual frother with a steam wand or a handheld frother for full control over microfoam. Automatic frothers are easier for basic frothy milk but cannot create the silky texture needed for art. Pair your frother with a quality pitcher and practice your pour to build skills over time.
What size milk pitcher is best for latte art beginners?
A 12 ounce pointed spout milk pitcher is best for latte art beginners because it offers the perfect balance of capacity and pour control. The pointed spout lets you create thin, steady streams for hearts and rosettas. Look for stainless steel with a welded handle and interior measurement markings to track your milk volume accurately.
What is a WDT tool and why should beginners use it?
A WDT tool is a small device with thin wires that you stir through the coffee grounds in your portafilter to break up clumps and distribute them evenly. Beginners should use a WDT tool to prevent channeling where water finds weak spots in the puck, causing uneven extraction. This simple step improves shot consistency and helps you taste the full flavor of your beans.
How do I practice latte art without wasting coffee?
You can practice latte art without wasting coffee by filling your pitcher with water and pouring into a dark mug to learn the wrist motion. Start with a steady stream, then work on the dot by raising and lowering the pitcher. Once you can pour a heart shape, move to rosettas, but remember that every barista started with blobs so focus on getting your milk texture right first.
Please upload banner from store admin blog pages